QIRX Remote Setup, Step-by-Step
This page is a guide how to get the QIRX Remote up and running. It is NOT an "instruction manual" how to operate the client browser. You can find this on the User Guide on this website.
Step1: Download, Unpack
- If not already done, go to the Download page of this website and follow the instructions. Select "QIRX Remote" as the product for download. Currently, you will receive a zip file, NOT an installer file like with QIRX.
- Check the SHA-1 hash by comparing the hash published on the Download page with a hash calculated by a suitable program like "HashCalc". If both hashes differ discard the downloaded zip file. But please be aware that the number of possible downloads is severly limited currently.
- Copy the downloaded zip file to a directory of your choice, and unzip.
Step2: Edit the "appsettings.json" file
-
Among the files, select the one named appsettings.json and open it by a text editor like
Windows notepad or notepad++. You will see something like this, the formatting might be different:
                    {
                    "Kestrel": {
                    "Endpoints": {
                    "Httpx": {
                    "Url": "http://192.168.0.99:2222"
                    }
                    }
                    },
                    "Logging": {
                    "LogLevel": {
                    "Default": "Debug",
                    "Microsoft.AspNetCore": "Warning"
                    }
                    },
                    "AllowedHosts": "*"
                    }
The only interesting line is the one beginning with "Url": Here, you should enter the IP Address under which your PC is addressable in your local LAN. If you don't know it, the "ipconfig" command , entered on a Windows command prompt, will tell you. Like so:

In my case, the WiFi on the machine where the Kestrel resides (i.e.192.168.0.99) is off, as the whole local LAN traffic is wire-connected (for this PC) going through the router, which is called "Default Gateway" in the ipconfig output.
Of course, if you want to communicate with a mobile device in your local LAN, the WiFi of your router must be enabled, and the mobile devices must be able to communicate with the Kestrel across your router.
The above describes the local network situation here, but it might be different in your case.
Thus, to make a long story short, you need to enter in the above line beginning with "Url" the IP address which reaches the PC hosting the Kestrel in your LAN. The "2222" behind the colon is the port which specifies the Kestrel server. It is the port where Kestrel is listening to. This port is completely arbitrary, but must be identical to the port you enter in the browser of your mobile device, following a colon after the IP address.
-
http or https?
You might have noticed that the "Url" line of the appsettings.json file contains a "http" and not "https". The reason is simple: As you here with QIRX Remote always are staying in your locally controlled network over which you have complete control, it is not necessary to encrypt the data transfer between your mobile device and the Kestrel server. In this case you can quietly use "http" instead of "https".
However, if you really wish or need to encrypt the data transfer in your LAN, the you must enter https: instead of http:. But this leads to another complication, as the browsers need to handle it properly. Technically spoken, they need a certificate they can trust to handle encrypted traffic.
The problem might be to get such a "trusted" certificate. Sadly, they are not coming for free, and they are rather expensive. However, what you can easily do is to create your own certificate, a so-called "own signed certificate", and give it the browser to handle the encrypted traffic. This needs - in Windows - one simple command on a command line. I show you in the Appendix of this page, how you can do it. But - as browsers are sceptical guys nowadays - they will ask for explicit permission from you to use your private certificate.
Step3: Starting the Web Server
Now follows an easy part: Start the Kestrel server just by a doubleclick on the file qirxRemote.exe. Hopefully, you will see
the following, in an opening command-line window:

The lines "Not initialized" show the normal behavior. The server is waiting for an "Initialization" command from a client. Let's proceed with it, and see how the system reacts.
The lines "Not initialized" show the normal behavior. The server is waiting for an "Initialization" command from a client. Let's proceed with it, and see how the system reacts.
Step4: Starting the Client: First Start
The "client" is my (rather old) iphone8. However, I could have used any other device with a browser, within my private LAN .
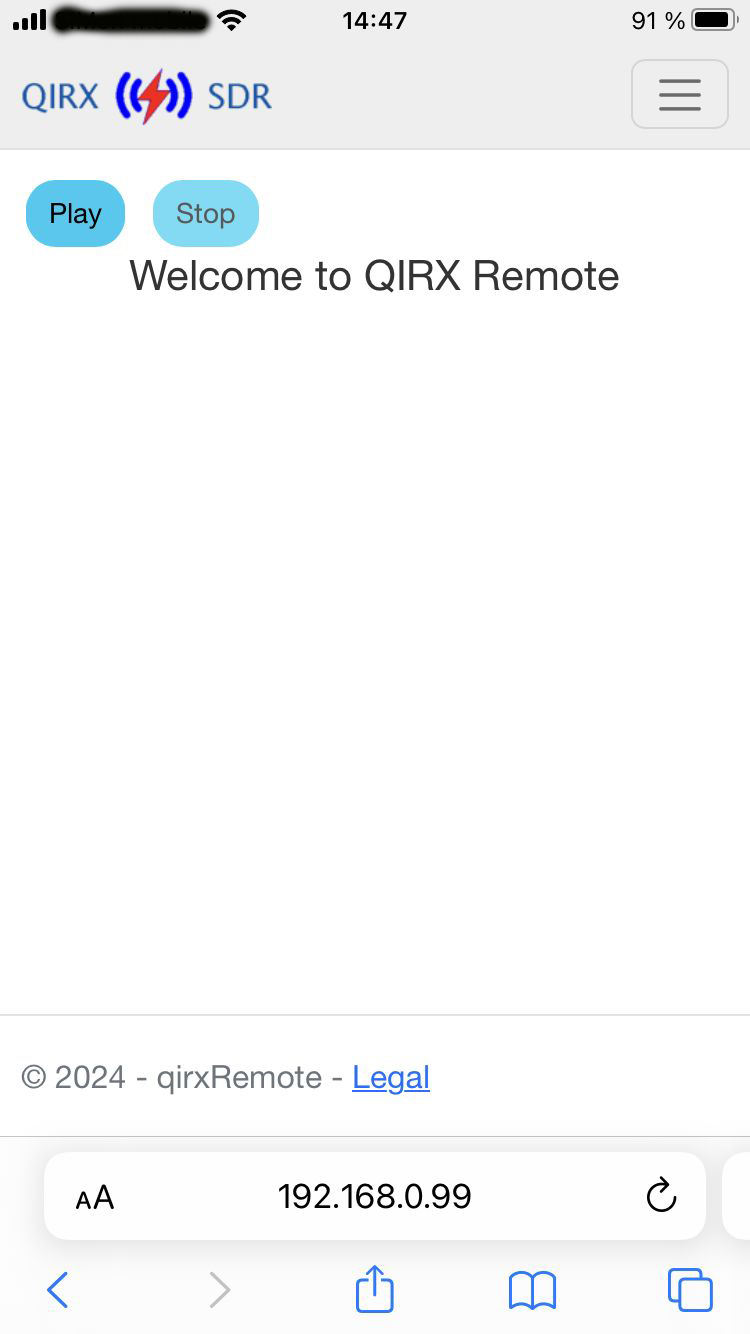
I start the Safari browser and enter the line:
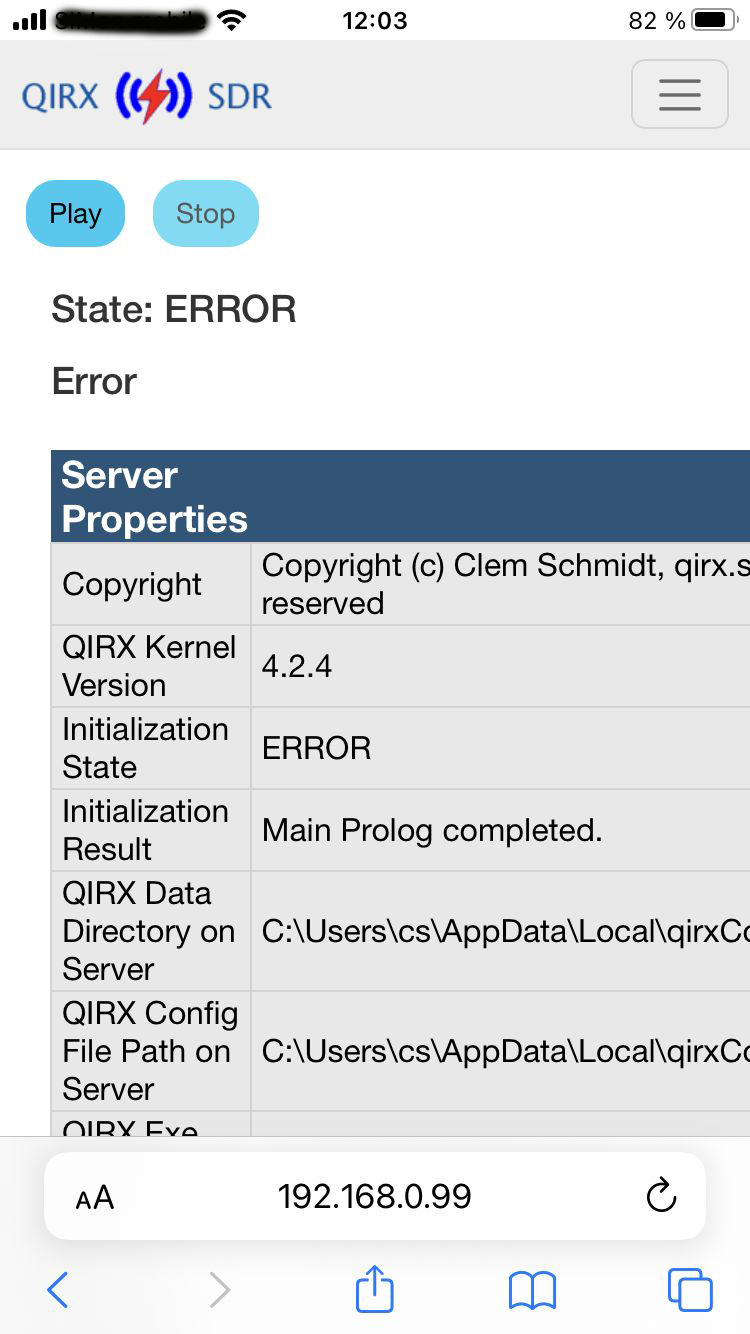
The first iphone screenshot shows you the "Welcome" screen. Now you can proceed on initializing the QIRX Kernel by opening the menu in the top-right corner, selecting "Initialize". The second iphone screen shows the response: Error.
The server output will give us more information: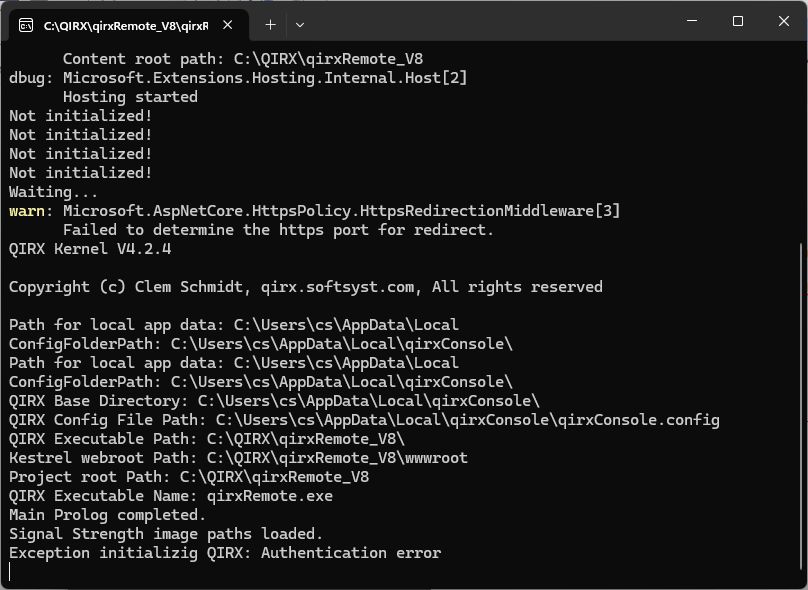
Apart from information about local file paths, and the line (twice) "Main Prolog completed", meaning that the QIRX Kernel startup has run successfully, it shows the reason of the above error: "Authentication error".
As in the standard GUI version of QIRX, the software needs your license key to run error free. While in standard QIRX the input is GUI-guided, here in this version it is not. It has to be done manually, but it is not a big deal.
Startup mission accomplished.
I start the Safari browser and enter the line:
http://192.168.0.99:2222
The first iphone screenshot shows you the "Welcome" screen. Now you can proceed on initializing the QIRX Kernel by opening the menu in the top-right corner, selecting "Initialize". The second iphone screen shows the response: Error.
After opening the menu on the top right and select "Initialize", you get an Error.
The server output will give us more information:
Apart from information about local file paths, and the line (twice) "Main Prolog completed", meaning that the QIRX Kernel startup has run successfully, it shows the reason of the above error: "Authentication error".
As in the standard GUI version of QIRX, the software needs your license key to run error free. While in standard QIRX the input is GUI-guided, here in this version it is not. It has to be done manually, but it is not a big deal.
Step5: Edit the Config File
The following is exactly the same what is happening in standard QIRX. However, there it is GUI-guided, here it has to be done manually,
as already mentioned. What is still missing, is to enter your license key into the file
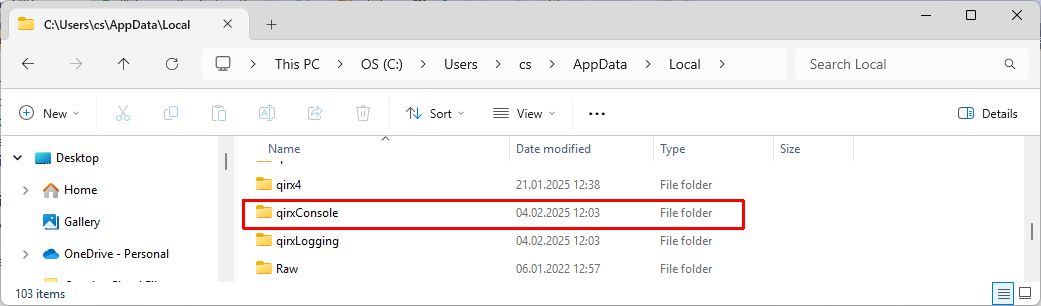
The creation of the file path to the data directory using by the QIRX Remote has been done automatically. In Windows Explorer, you find it in the following directory:
Here on my system it looks like so, on Windows Explorer:
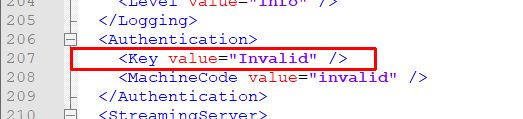
Opening the
The picture shows you in the red box the line where you need to enter your license key. You find that line rather at the bottom.
In the
Remark:
In the config file, below the "Authentication" tag, you find a tag "Streaming Server". That one does NOT denote your Kestrel streaming server and has nothing to do with QIRX Remote, but denotes the QIRX built-in server for the streaming of I/Q data to other SDR apps.
qirxConsole.config.
The creation of the file path to the data directory using by the QIRX Remote has been done automatically. In Windows Explorer, you find it in the following directory:
C:\Users\<your user name>\AppData\Local\qrixConsole
Here on my system it looks like so, on Windows Explorer:
Opening the
qirxConsole directory, you will find the file qirxConsole.config. Now you need to open
this file in a text editor like notepad or notepad++. I select notepad++, as it nicely shows the xml structure of the file (after having
selected the menu "Language, XML").
The picture shows you in the red box the line where you need to enter your license key. You find that line rather at the bottom.
In the
Key field, instead of "Invalid", please enter your license key, like "ABCDE-FGHIK-123XY-LMNOP".
The "MachineCode" entry is not necessary.
Remark:
In the config file, below the "Authentication" tag, you find a tag "Streaming Server". That one does NOT denote your Kestrel streaming server and has nothing to do with QIRX Remote, but denotes the QIRX built-in server for the streaming of I/Q data to other SDR apps.
Step 6: Startup Again
Now, please terminate your Server from the command line (click in x on the right top) and start the 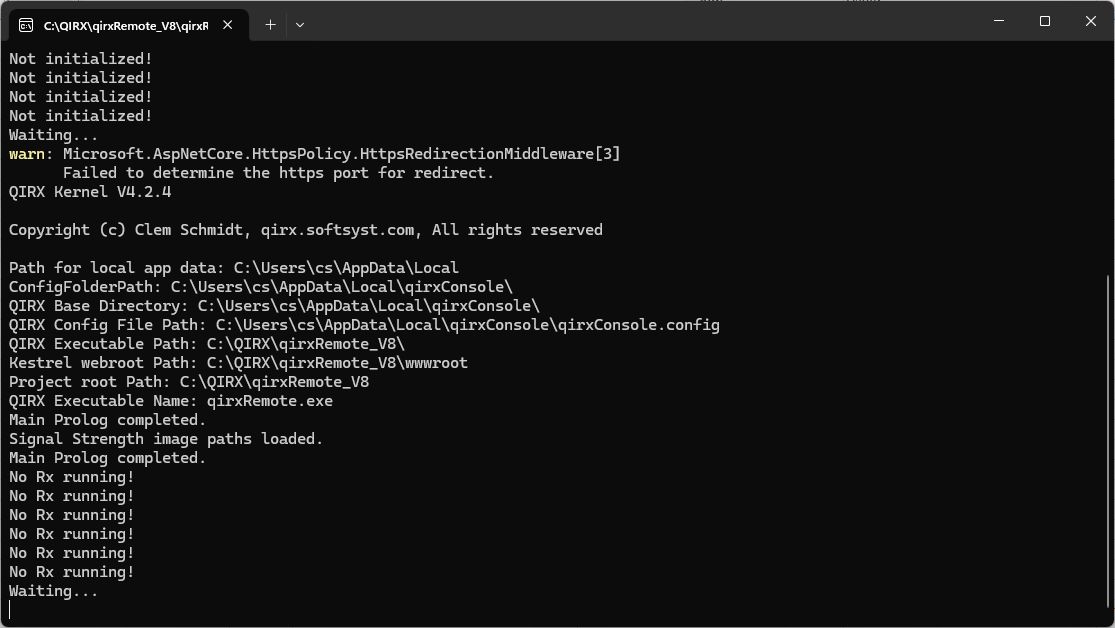
No error messages any more, only complaints that no receiver is running yet. You find how to start a receiver in the User Manual section on this website.
And a final screenshot for this "Startup" section shows the reaction of the client after having called the menu "Initialization":

No more error message here as well, all fine now.
Final Remark:
The most things we did here in this section are necessary only once. Once successfully done, you never need to edit your
From now on, all actions will take place on the client. The server can do its work silently behind the scenes.
qirxRemote.exe again.
Please repeat Step 4 again. The Server console should show you the following:
No error messages any more, only complaints that no receiver is running yet. You find how to start a receiver in the User Manual section on this website.
And a final screenshot for this "Startup" section shows the reaction of the client after having called the menu "Initialization":
No more error message here as well, all fine now.
Final Remark:
The most things we did here in this section are necessary only once. Once successfully done, you never need to edit your
qirxConsole.config any more, nor edit fancy .json files nor start twice to avoid startup errors.
Startup mission accomplished.
Appendix: Create your own https certificate
The following describes the content of the file (contained in the downloaded zip)
OwnCertificateHandling.txt.
It contains some commands, to be entered on a Windows command-line, which create your private certificate which is then
used by the browsers.
                    https://learn.microsoft.com/en-us/dotnet/core/tools/dotnet-dev-certs

                    # check if own cert is present, if not, create one
                    # usually, this command is the only one needed
                    dotnet dev-certs https

                    # remove
                    dotnet dev-certs https --clean

                    #import pfx file#
                    dotnet dev-certs https --clean --import ./certificate.pfx -p

                    #Check if a trusted development certificate is present on the local machine.
                    dotnet dev-certs https --check --trust

                    # Create a certificate, trust it, and export it to a PFX file.
                    dotnet dev-certs https -ep ./certificate.pfx -p  --trust

                    # Create a certificate, trust it, and export it to a PEM file including the private key:
                    dotnet dev-certs https -ep ./certificate.crt -p  --trust --format PEM