QIRX SDR

Linux Console Version
Step-By-Step
This describes the installation and startup procedure for the .net6 Console Version of QIRX, called qirxConsole. The Linux distribution used
is Debian 11 ("Bullseye"), 64Bit.
The installation procedures described here may be different on other systems.
To see the qirxConsole running in an Ubuntu Virtual Machine, you might have a look at this youtube video, recorded
by Herman Wijnants:
Prerequisites
-
Remark: It is assumed that the path
/usr/lib/x86_64-linux-gnuis part of the search path of the library loader. In one of the steps below the necessary library files are copied to that location.
QIRX Installation
- Step 1: Copy the downloaded file qirxConsole_Linux_xyz.zip into an arbitrary directory of your choice.
-
Step 2: The zip file should contain a directory qirxConsole_Linux_xyz. Copy it out of the zip file into the directory of your choice.
Its content should look like so:
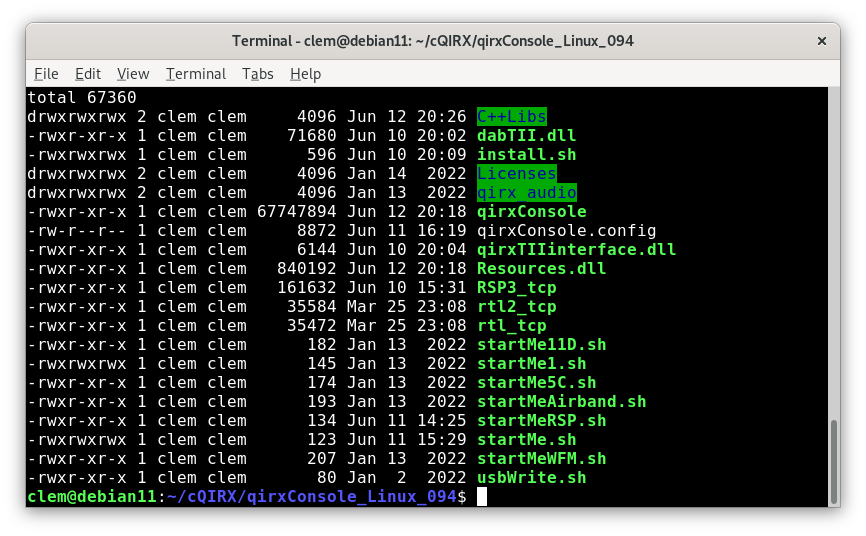
The names in the green blocks denote directories. -
Step 3: To avoid collisions with a possibly existing version of librtlsdr, remove it by typing
sudo apt-get remove librtlsdr0. This command might be different on non-Ubuntu or non-Debian distributions. -
Step 4: Run the script "install.sh" by typing
sh install.sh, requesting you to enter the root password.
The script does the following:- Permissions: All files get the necessary permission (execute or read/write).
-
File Copy: The "own" shared libraries
- libffts.so, performing the Fast Fourier Transform,
- viterbi.so, performing the Forward Error Correction for DAB and DAB+,
- kjmp2.so, performing the MP2 decoding for DAB,
- librtlsdr.so, performing the library for the rtl_tcp I/Q server by old-dab,
- libfaad.so, performing the AAC decoding for DAB+,
- libportaudio.so.2, performing the audio output are all copied to the directory/usr/lib/x86_64-linux-gnu/,
- The directory qirxConsole, is created in the local data directory~/.local/share
- The initial configuration file qirxConsole.config, is copied to the local data directory~/.local/share/qirxConsole
The content of theqirxConsole_Linux_094(name as an example for the version 0.9.4) directory now should reflect the changed permissions.
Running qirxConsole
-
Step 5: From within the
qirxConsole_Linux_094directory, type (case-sensitive)./startMe.sh
The following should happen (pictures are from a previous version):
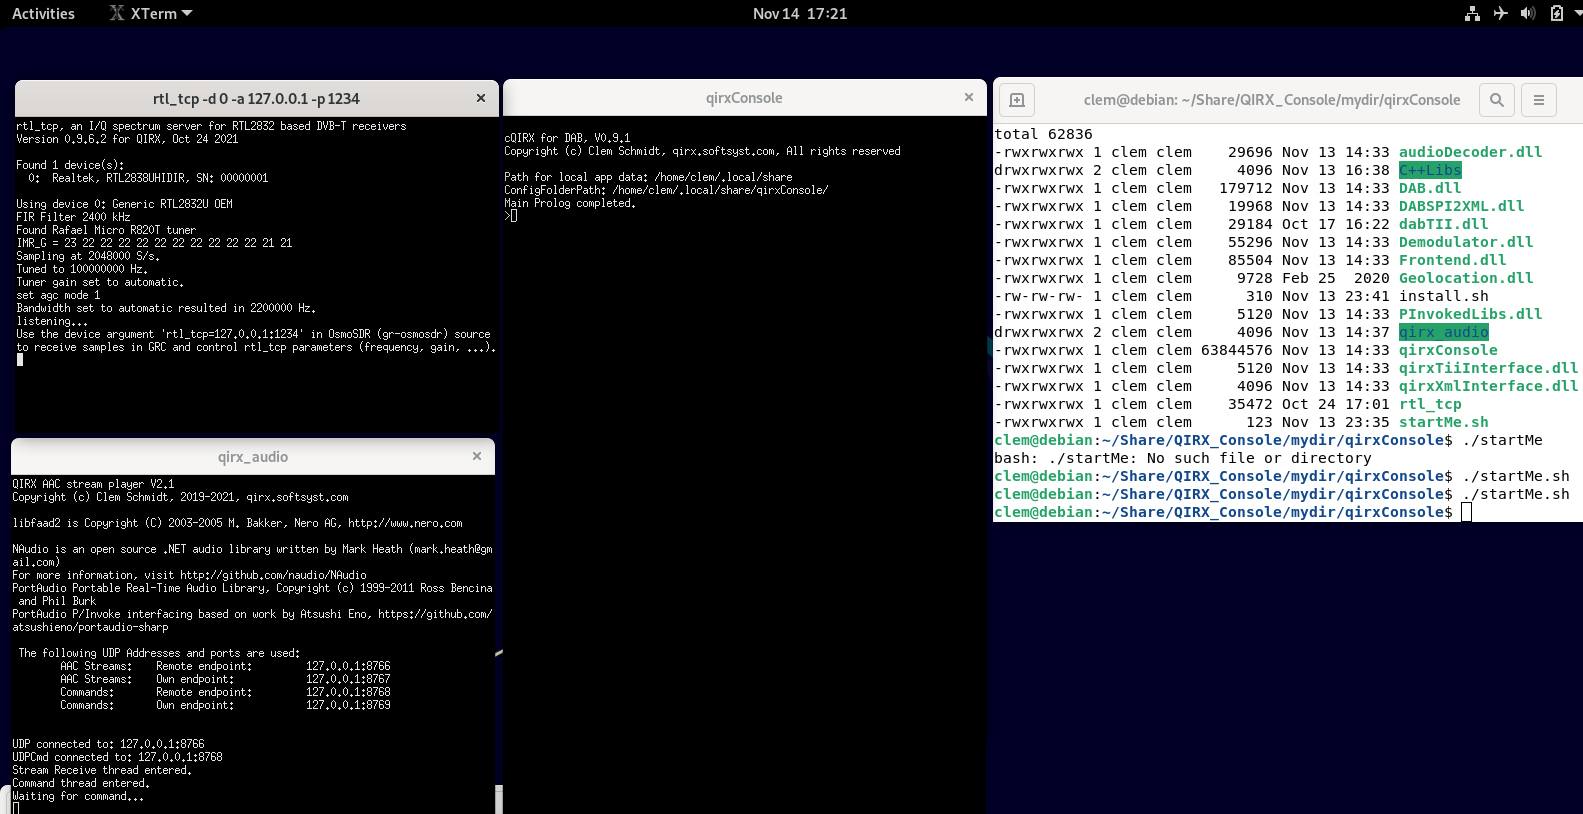 Three xterm consoles should have opened:
- rtl_tcp...: It will get the output from the rtl_tcp I/Q data server.
- qirx_audio: It will get the output from the qirx_audio program, when DAB has been selected.
- qirxConsole: From this input/output window you will operate the qirxConsole program.
Important Remark: In case of the rtl_tcp console not showing up or showing errors, then your RTL-SDR hardware is not recognized properly. You must first repair this situation before proceeding.
Unfortunately, there might be several reasons for this situation:-
The original driver present on the Linux distribution prevents the proper loading of the rtlsdr library.
This site describes the following "blacklisting" as a solution:
echo 'blacklist dvb_usb_rtl28xxu' | sudo tee – append /etc/modprobe.d/blacklist-dvb_usb_rtl28xxu.conf -
The USB ports are write-protected, for whatever reason.
The provided script "usbWrite.sh" might help:
sudo sh usbWrite.sh
Root privileges are necessary. - Another possible source of such a situation is that often not all USB ports work together with RTL-SDR dongles.
-
The original driver present on the Linux distribution prevents the proper loading of the rtlsdr library.
This site describes the following "blacklisting" as a solution:
-
Step 6: Example how to make a DAB reception using rtl_tcp.
-
TCP/IP connection:
In the qirxConsole window, type
start=1
QIRX tries to make a TCP/IP connection to receiver #1, with the parameters from the configuration file qirxConsole.config. This file is residing in the directory
~/.local/share/qirxConsole/qirxConsole.config.
There you find the parameters for three receivers, the default for rx#1 is 127.0.0.1 1234 (IP Address, Port). These must match the parameters for the rtl_tcp xterm in the script filestartMe.sh.
In case it should be absent, it must be manually copied from the fileqirxConsole.configcontained in the installation directory.
The output in the rtl_tcp and qirxConsole windows is like the next picture: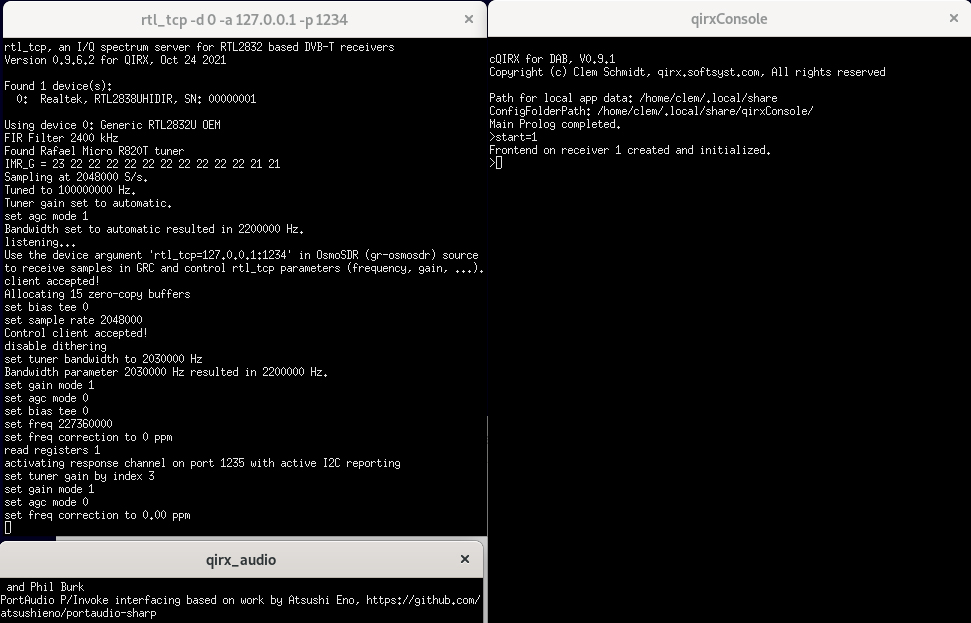
-
Select and create a demodulator: type
demod=DAB
-
Select an (available!) ensemble: type e.g.
ens=5C
-
Select an available service: type e.g.
serv=Dlf
After this step the output should be similar to the following picture:
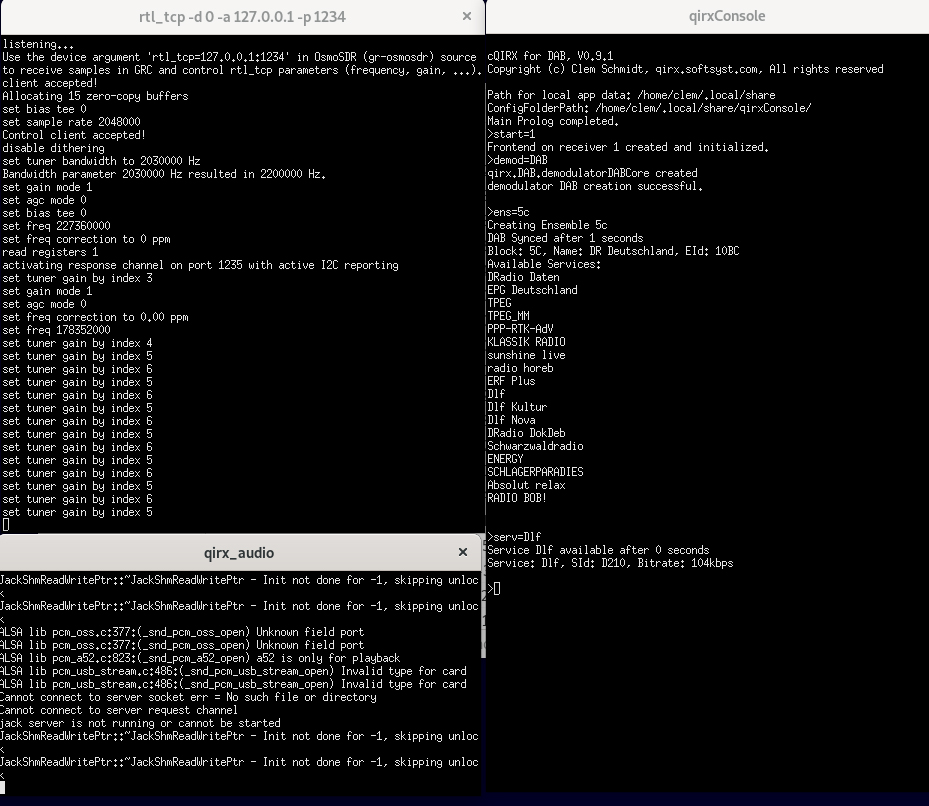
After this step, the qirx_audio will output some information, as audio is now generated. -
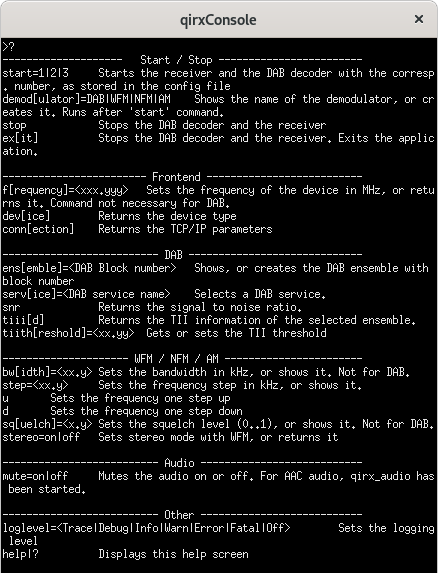
Get help
Enteringhelpor a questionmark will list all possible commands.
-
TCP/IP connection:
In the qirxConsole window, type
-
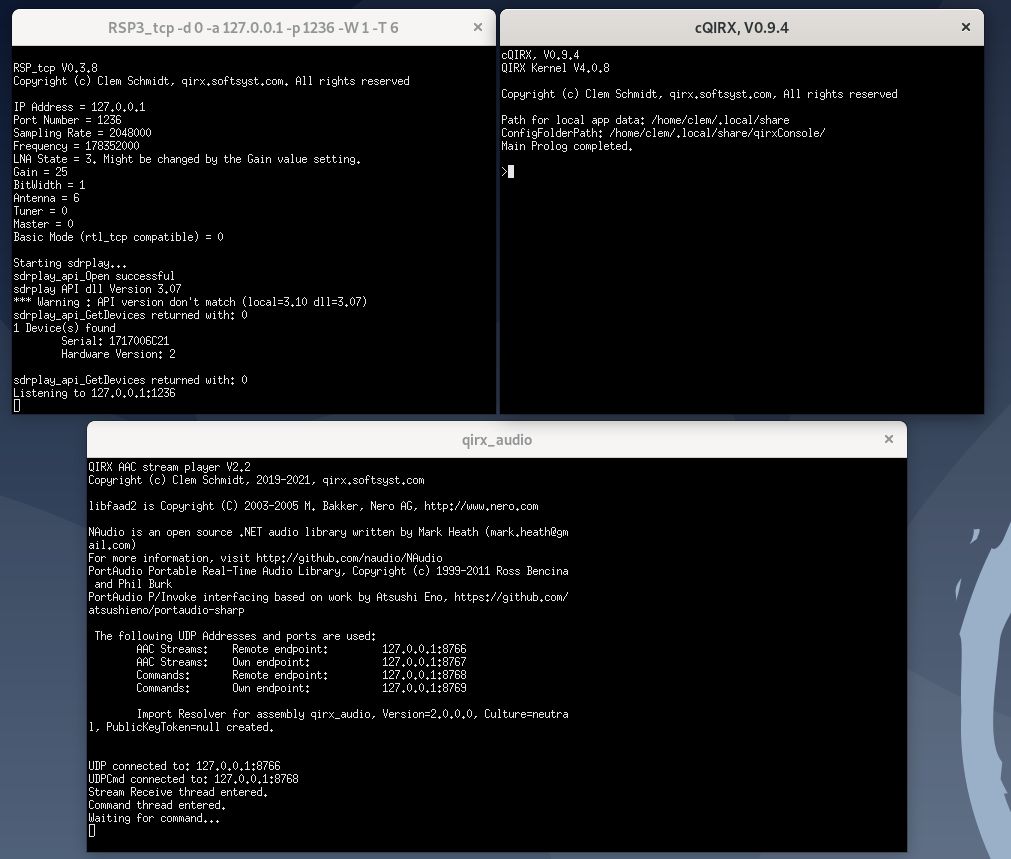
Step 7: Example how to make a DAB reception with an RSP device, using the provided
qirxConsole.configfile
-
Start the script
In the Linux terminal window, type
sh startMeRSP.sh
QIRX tries to start theRSP3_tcpprogram with its commandline parameters, theqirxConsolesoftware and theqirx_audioprogram.
The result:
-
TCP/IP connection:
In the qirxConsole window, type
start=2
QIRX tries to make a TCP/IP connection to receiver #2, with the parameters from the configuration file qirxConsole.config, in the directory.
~/.local/share/qirxConsole/qirxConsole.config.
There , the default for rx#2 is 127.0.0.1 1236 (IP Address, Port). These must match the parameters for theRSP3_tcpxterm in the script filestartMeRSP.sh.
This file uses the commandline parameter -T 6, meaning to use antenna B in an RSP2 device. If you run it with a RSP1A device, the parameter is ignored. With a RSPduo device, you must edit this shell script and delete the -T 6, as it would mean "use receiver B", which is not supported.
With a RSPdx device, the three antenna inputs use parameters 0,1,2 for inputs A,B,C. Thus, the shell script must be changed to e.g. -T 1 for antanna B.
Parameter -W 1 means 8-bit output for I/Q data. -
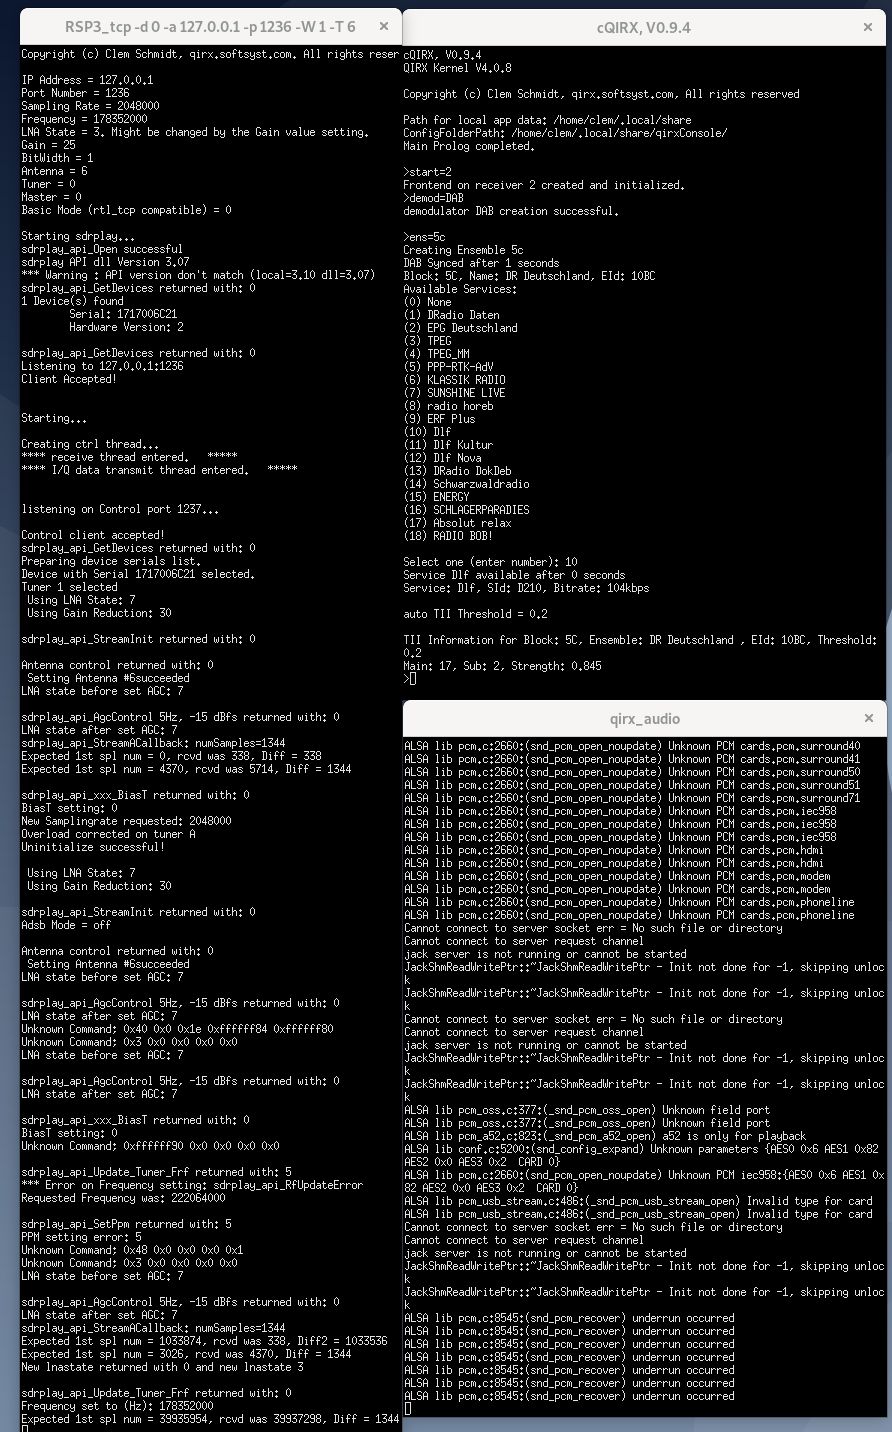
Select and create a demodulator: type
demod=DAB
-
Select an (available!) ensemble: type e.g.
ens=5C
If in range, the multiplex 5C will synchronize and show all of its services, prefixed by a number. -
Select an available number: type e.g.
10
After this step, the "Dlf" service will be selected, and audio is now generated.
The next picture shows the complete sequence in all three participating Terminal Windows. Please note that user input ONLY takes place in thecQIRX, V0.9.4window. The other two windows are for information only.
-
Hint for usage with the RSPs
In case the RSP_tcp will not properly start the device, the reason might be that the sdrplay demon must be restarted.
For this case, sdrplay provides a script, calledrestartService.sh, to be started with
sudo sh restartService.sh.
Here, this helped in many cases.
-
Start the script
A friendly request: For questions, critics, suggestions, discussions and the like, please consider to use the forum having been created for this purpose.